Sushi Salmon Bake: How to Make It in 30 Minutes
Tired of spending hours rolling individual sushi pieces or paying premium prices at restaurants for mediocre sushi? You’re not alone. Many home cooks avoid making sushi because they think it’s too complicated, time-consuming, or requires expensive ingredients and special tools.
This Sushi Salmon Bake promises to deliver all the flavors you love about sushi in one easy, baked dish that’s ready in just 30 minutes. Picture layers of seasoned sushi rice topped with creamy, flaky salmon and finished with that signature spicy mayo drizzle – it’s like deconstructed sushi that actually tastes better than the original.
As a professional sushi chef with over 12 years of experience in Japanese cuisine, I’ve discovered that the secret to exceptional Sushi Salmon Bake lies in properly seasoning each layer and achieving the perfect balance of textures. This method eliminates the intimidation factor while delivering restaurant-quality results that will impress your family and friends.
In this comprehensive guide, you’ll discover expert salmon selection tips, foolproof rice preparation techniques, and creative variations that will make this Sushi Salmon Bake your go-to recipe for quick, satisfying meals that capture the essence of authentic sushi.
Why This Recipe Works
This Sushi Salmon Bake has revolutionized home sushi making because it delivers on three essential qualities that busy home cooks need: incredible authentic flavor, unmatched convenience, and impressive versatility.
• Uses affordable, easy-to-find salmon fillets – Transform regular grocery store salmon into restaurant-quality sushi without expensive sashimi-grade fish • Ready in just 30 minutes from start to finish – No rolling, no special techniques, just layer and bake for effortless sushi satisfaction • Perfect for feeding crowds or meal prep – One pan serves 6-8 people and tastes amazing as leftovers the next day • Beginner-friendly with foolproof results – Even first-time sushi makers can achieve professional-looking results with this simple method • Customizable to dietary preferences – Easily adapt for gluten-free, low-carb, or different protein preferences
Choosing the Right Salmon
Selecting quality salmon is crucial for creating a delicious Sushi Salmon Bake that delivers the clean, fresh flavors you expect from sushi. Different types and cuts will affect both taste and texture.
Best Cuts for This Recipe
Atlantic Salmon Fillet: The most reliable choice for Sushi Salmon Bake due to its rich fat content and mild flavor. The marbling ensures the fish stays moist during baking while providing that buttery texture sushi lovers crave.
Sockeye Salmon: Offers a more robust, complex flavor with beautiful deep orange color. This variety has less fat than Atlantic salmon but delivers intense, authentic salmon taste that stands up well to the other flavors in the dish.
Coho Salmon: A middle ground option with moderate fat content and delicate flavor. It bakes beautifully and flakes perfectly for the layered presentation of Sushi Salmon Bake.
Skin-On vs Skinless: Both work well, though skin-on fillets tend to hold together better during baking. The skin can be easily removed after cooking if preferred.
Buying Tips
Look for bright orange-pink color with no brown spots or strong fishy odor – fresh salmon should smell like the ocean, not “fishy.” The flesh should feel firm and spring back when gently pressed, not leave an indentation.
Ask your fishmonger for fillets that are uniform in thickness (about 1-1.5 inches) to ensure even cooking. If buying pre-packaged salmon, check the sell-by date and choose packages with minimal liquid accumulation.
For best results, buy salmon the day you plan to make your Sushi Salmon Bake, or freeze immediately if purchasing in advance.
Substitutions
Swap in arctic char for a similar texture with slightly milder flavor. Steelhead trout works beautifully and often costs less than salmon while providing comparable results. For budget-friendly options, canned salmon (drained and flaked) can work in a pinch, though the texture will be different.
Ingredients & Prep
Proper preparation and quality ingredients are the foundation of exceptional Sushi Salmon Bake. Taking time to prep each component correctly ensures perfect layers and authentic flavors.
Salmon Prep Essentials
Removing Pin Bones: Run your fingers along the fillet to locate any remaining pin bones and remove with tweezers or needle-nose pliers. This step is crucial for a pleasant eating experience.
Portioning: Cut salmon into uniform 1-inch cubes for even cooking and easy serving. Larger pieces may not cook through properly in the 30-minute timeframe.
Seasoning: Lightly salt the salmon 15-20 minutes before cooking to enhance flavor and help remove excess moisture. Pat dry with paper towels just before assembling the dish.
Marinades & Seasonings
Soy-Ginger Marinade: Combine soy sauce, rice vinegar, minced ginger, and a touch of mirin. Let salmon marinate for 10-15 minutes for deeper flavor penetration.
Spicy Mayo Base: Mix mayonnaise, sriracha, rice vinegar, and a hint of sesame oil. This serves as both a marinade component and the signature topping sauce.
Furikake Seasoning: This Japanese seasoning blend of sesame seeds, seaweed, and bonito flakes adds authentic umami depth to your Sushi Salmon Bake.
Pantry Staples
Sushi Rice: Short-grain Japanese rice is essential for proper texture and stickiness. Regular long-grain rice won’t provide the same authentic mouthfeel.
Rice Vinegar: Creates the characteristic tangy flavor that makes sushi rice distinctive from regular steamed rice.
Nori Sheets: Torn or cut into small pieces for sprinkling on top, adding that classic seaweed flavor and visual appeal.
Sesame Seeds: Both black and white varieties provide crunch and nutty flavor that complements the rich salmon.
Step-by-Step Cooking Instructions
Follow these detailed steps to create a perfect Sushi Salmon Bake that delivers authentic flavors and beautiful presentation in just 30 minutes.
Pre-Cooking Prep
Preheat your oven to 375°F and lightly grease a 9×13 inch baking dish. Rinse sushi rice until water runs clear, then cook according to package directions with a 1:1.2 rice-to-water ratio.
While rice cooks, cut salmon into uniform cubes and season lightly with salt. Let sit at room temperature for 15 minutes to ensure even cooking temperature throughout.
Prepare your spicy mayo sauce by whisking together mayonnaise, sriracha, rice vinegar, and sesame oil. Set aside half for drizzling after baking.
Cooking Method
Layer 1 – Seasoned Rice: Mix cooked rice with rice vinegar, salt, and a touch of sugar while still warm. Spread evenly in prepared baking dish, pressing gently to create a firm base.
Layer 2 – Salmon Mixture: Toss cubed salmon with half the spicy mayo mixture and spread evenly over rice. The salmon should cover the rice completely for even cooking.
Baking: Place in preheated oven for 15-18 minutes until salmon flakes easily with a fork and the top is lightly golden. Avoid overbaking to prevent dry salmon.
Doneness Check
Salmon is perfectly cooked when it flakes easily with a fork and reaches an internal temperature of 145°F. The flesh should be opaque throughout with no translucent areas remaining.
The rice should be heated through and slightly crispy on the edges where it touches the pan. This creates a delightful textural contrast to the tender salmon.
Resting and Finishing
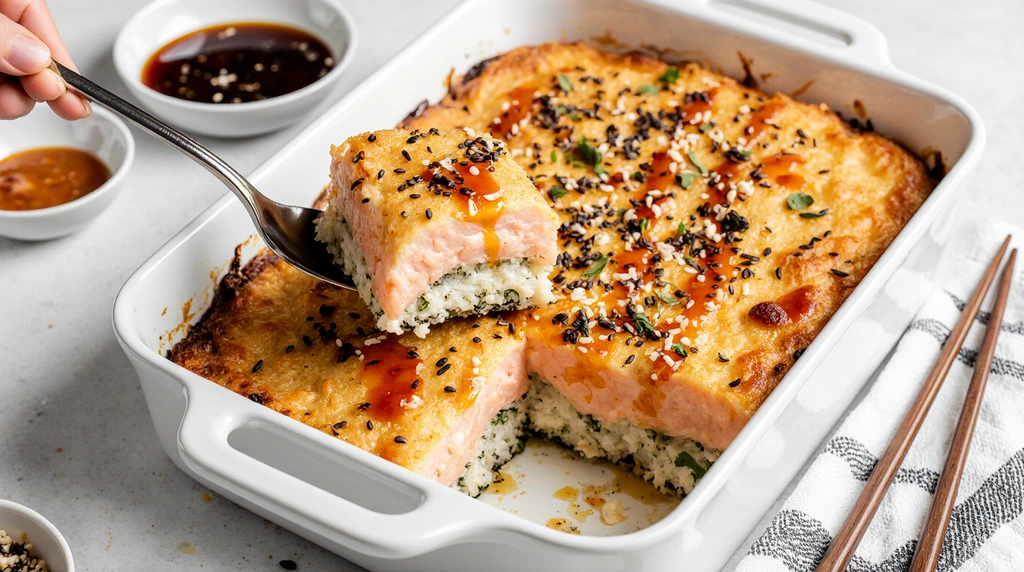
Remove from oven and let cool for 3-5 minutes to allow flavors to settle and prevent burning your mouth on the hot dish. Drizzle with remaining spicy mayo sauce in decorative patterns.
Sprinkle with togarashi, sesame seeds, and torn nori just before serving for maximum crunch and visual appeal. Serve immediately while still warm for the best texture contrast.
Pro Tips for Perfect Results
Master these professional techniques to elevate your Sushi Salmon Bake from good to restaurant-quality exceptional.
Avoiding Dry/Overcooked Salmon
Don’t overbake – Salmon continues cooking from residual heat after removing from oven. Check doneness at 15 minutes and remove as soon as it flakes easily.
Use a meat thermometer for precision – 145°F internal temperature ensures perfectly cooked salmon that’s moist and flaky, not dry or rubbery.
Cover with foil if browning too quickly – This prevents the top from overcooking while the center reaches proper temperature.
Tool Recommendations
9×13 inch glass baking dish: Provides even heat distribution and allows you to monitor browning through the transparent bottom.
Rice cooker or heavy-bottomed pot: Essential for perfect sushi rice texture without burning or sticking.
Instant-read thermometer: Takes the guesswork out of determining when salmon is perfectly cooked.
Offset spatula: Makes spreading rice and sauce layers smooth and professional-looking.
Storage & Reheating
Refrigerator storage: Cool completely before covering and refrigerating for up to 3 days. The flavors actually improve overnight as they meld together.
Reheating technique: Cover with foil and reheat at 325°F for 10-15 minutes, or microwave individual portions for 30-45 seconds until heated through.
Meal prep friendly: Portion into individual containers with sauce on the side to prevent sogginess during storage.
Flavor Variations
Transform your basic Sushi Salmon Bake into exciting culinary adventures with these creative variations that cater to different tastes and dietary preferences.
Spicy Twist
Korean-Inspired Heat: Add gochujang paste to your spicy mayo and sprinkle with kimchi for fermented tang and serious heat that complements the rich salmon.
Jalapeño Popper Style: Mix diced jalapeños into the salmon layer and top with cream cheese mixture for a fusion twist that’s both creamy and spicy.
Buffalo Salmon Bake: Replace spicy mayo with buffalo sauce mixed with cream cheese, then top with blue cheese crumbles and celery leaves.
Keto/Low-Carb Options
Cauliflower Rice Base: Replace sushi rice with seasoned cauliflower rice for a low-carb version that still absorbs all the delicious salmon flavors.
Zucchini Noodle Layer: Use spiralized zucchini as the base layer, lightly salted and drained to remove excess moisture before baking.
Avocado-Heavy Version: Double the avocado content and reduce rice portions for healthy fats while maintaining the creamy texture profile.
Global Flavors
Mediterranean Twist: Add sun-dried tomatoes, olives, and feta cheese with a lemon-herb dressing instead of spicy mayo.
Teriyaki Glazed: Brush salmon with teriyaki sauce before baking and garnish with pineapple chunks and scallions for sweet-savory balance.
Mexican Fusion: Season with cumin and chili powder, add black beans and corn, then top with avocado crema and cilantro.
Serving Suggestions
Complete your Sushi Salmon Bake experience with complementary sides and presentation ideas that enhance the overall dining experience.
Fresh Accompaniments: Serve with cucumber salad dressed in rice vinegar, sliced avocado with a sprinkle of everything bagel seasoning, or crisp edamame for authentic Japanese flavors.
Textural Contrasts: Add tempura vegetables, crispy wonton strips, or toasted panko breadcrumbs on top for satisfying crunch that mimics traditional sushi textures.
Pickled Elements: Traditional pickled ginger and wasabi on the side allow diners to customize their heat level and palate-cleansing experience.
Sauce Stations: Offer additional soy sauce, eel sauce, and sriracha mayo in small bowls for individual customization preferences.
Beverage Pairings: Green tea, sake, or light beer like Asahi complement the rich salmon flavors. For wine lovers, a crisp Sauvignon Blanc or Pinot Grigio works beautifully.
Presentation Ideas: Garnish with microgreens, edible flowers, or colorful vegetable julienne strips for restaurant-quality visual appeal that makes the dish Instagram-worthy.
FAQs
Can I use frozen salmon?
Yes, but thaw completely first and pat very dry to remove excess moisture. Frozen salmon may release more liquid during baking, so consider adding 5-10 minutes to cooking time and drain any accumulated juices halfway through.
How do I fix overcooked salmon?
Prevention is key, but if salmon becomes dry, immediately drizzle with extra spicy mayo or a mixture of melted butter and lemon juice. Mix gently to distribute moisture throughout the dish.
Is this recipe safe for pregnant women?
Yes, when salmon reaches the recommended internal temperature of 145°F. Pregnant women should avoid raw or undercooked fish, so ensure the salmon flakes easily and is opaque throughout before serving.
Can I make this ahead of time?
The rice layer can be prepared up to 24 hours in advance and refrigerated. Add the salmon layer just before baking for best texture. Fully assembled dishes can be refrigerated for 2 hours before baking.
What if I don’t have sushi rice?
While sushi rice provides the best texture and flavor, you can substitute with other short-grain rice varieties like Arborio or even jasmine rice in a pinch. The texture will be different but still delicious.
How do I know when it’s perfectly done?
Look for salmon that flakes easily with a fork, reaches 145°F internal temperature, and has lightly golden edges. The rice should be heated through and slightly crispy where it touches the pan.
Conclusion
This Sushi Salmon Bake delivers all the satisfying flavors of your favorite sushi roll in an easy, approachable format that anyone can master in just 30 minutes. The combination of perfectly seasoned sushi rice, tender baked salmon, and creamy spicy mayo creates a restaurant-quality dish that brings the sushi bar experience right to your kitchen.
Preheat your oven and try this amazing Sushi Salmon Bake tonight – your family will be amazed at how something so delicious can be so simple to make! The beauty of this recipe lies in its flexibility and foolproof technique that guarantees success every time.
Join thousands of home cooks who’ve discovered the magic of this viral Sushi Salmon Bake recipe. Once you master this fundamental technique, you’ll have the confidence to experiment with countless variations that keep your dinner routine exciting and delicious.
Ready to explore more creative sushi-inspired dishes? Try our collection of baked sushi recipes that showcase different proteins and flavor profiles – there’s a perfect variation for every taste preference and dietary need!
Did you like this recipe?
There are no reviews yet. Be the first one to write one.