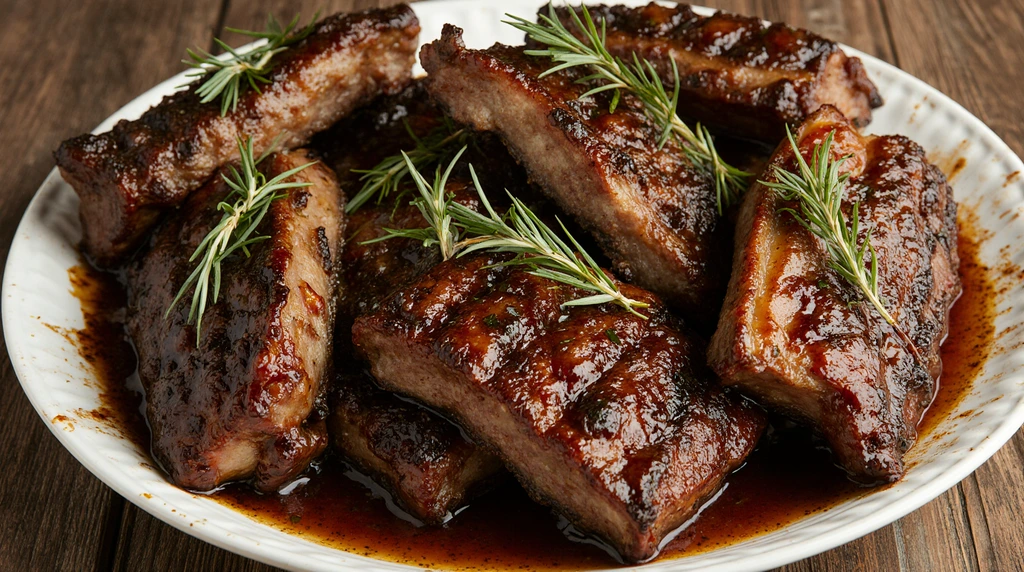
How to Cook Short Ribs in the Oven: 5 Easy Steps to Perfection
Table of Contents
Tired of short ribs that turn out tough, chewy, and disappointing despite hours of cooking? Nothing’s more frustrating than spending your hard-earned money on premium beef only to serve dry, flavorless meat to your family. The good news is that learning how to cook short ribs in the oven properly transforms these tough cuts into fork-tender, melt-in-your-mouth perfection that rivals the best steakhouse experience. When you master how to cook short ribs in the oven, you’ll never struggle with tough meat again.
This foolproof oven-braising method delivers restaurant-quality short ribs with deep, rich flavors and silky textures that fall off the bone. The secret lies in understanding the science behind low, slow cooking and how proper preparation maximizes the natural marbling and collagen in these incredible cuts.
As a professional chef with over 12 years of experience in high-end restaurants and catering, I’ve perfected this technique through countless hours of testing different temperatures, cooking times, and preparation methods. This method consistently produces exceptional results, whether you’re cooking for a special occasion or elevating a weeknight dinner.
In this comprehensive guide, you’ll discover the best cuts to choose, essential preparation techniques, my proven 5-step cooking method, and professional tips that guarantee success every time. Plus, you’ll learn flavor variations, serving suggestions, and troubleshooting advice that takes the guesswork out of cooking perfect short ribs.
Why This Meat Recipe Works
This oven-braised short rib method succeeds where other techniques fail because it combines the precision of controlled oven heat with time-tested braising principles. Knowing how to cook short ribs in the oven with proper technique is what separates restaurant-quality results from disappointing home cooking attempts. Here’s what makes this method so effective:
• Uses affordable, readily available cuts of meat – Short ribs cost significantly less than prime steaks but deliver superior flavor and satisfaction when cooked properly using this method
• Transforms tough collagen into silky richness in just 3 hours – The low oven temperature (275°F) slowly breaks down connective tissues without drying out the meat, creating that coveted fork-tender texture
• Perfect for any cooking skill level – This hands-off technique requires minimal active cooking time, making it ideal for busy weeknights or when entertaining guests without stress
• Delivers consistent results every time – Unlike grilling or pan-searing, oven braising provides even heat distribution that eliminates hot spots and prevents overcooking
• Creates incredible depth of flavor – The combination of proper searing, aromatic vegetables, and slow braising develops complex, restaurant-quality flavors that improve even more the next day
• Scales easily for any group size – Whether cooking for two or twenty, this method adapts perfectly by simply adjusting your Dutch oven size and ingredient quantities
Choosing the Right Meat
Selecting the proper cut is absolutely critical when learning how to cook short ribs in the oven successfully. Understanding the differences between cuts and what to look for at the butcher counter will dramatically impact your final results. The right cut makes all the difference in how to cook short ribs in the oven properly.
Best Cuts for This Recipe
English-cut short ribs are the gold standard for oven braising, cut parallel to the rib bones in rectangular pieces typically 2-4 inches thick. These cuts contain the perfect balance of meat, fat, and bone that creates maximum flavor during the slow cooking process. The bone adds richness to the braising liquid while the marbling ensures moist, tender results.
Flanken-style short ribs, cut across the bones into thin strips, work well but require adjusted cooking times due to their thinner profile. These cook faster (about 2 hours instead of 3) and are excellent for Asian-inspired preparations or when you want quicker results.
Chuck short ribs from the shoulder area offer exceptional value while delivering nearly identical results to more expensive cuts. They contain similar amounts of connective tissue and marbling, making them perfect for budget-conscious home cooks without sacrificing quality.
Buying Tips
When shopping for short ribs, look for pieces with bright red meat and creamy white fat marbling throughout. Avoid cuts with dark, dry-looking surfaces or yellowed fat, which indicate age and will result in less flavorful, tougher meat.
Choose ribs that are at least 2 inches thick for optimal results – thinner cuts can overcook and dry out even with careful temperature control. Don’t be afraid to ask your butcher for specific cuts or to trim excess fat if needed. Many grocery stores keep premium short ribs in the back and will cut them fresh upon request.
The ideal short ribs should feel firm to the touch with good marbling visible throughout the meat. Plan on about 1 pound per person, as the bones and fat add weight but the rich flavor means smaller portions are satisfying.
Substitutions
While beef short ribs are preferred for this recipe, chuck roast cut into large chunks works as an economical substitute with similar cooking times and techniques. Lamb shanks or pork shoulder can also be prepared using this method, though cooking times may vary slightly.
For those avoiding red meat, bone-in chicken thighs follow similar braising principles but require reduced cooking time (about 1.5 hours) and temperature monitoring to prevent overcooking.
Ingredients & Prep
Success in learning how to cook short ribs in the oven starts with proper preparation and quality ingredients. Understanding how to cook short ribs in the oven begins with this foundation, which ensures maximum flavor development and perfect texture in your finished dish.
Meat Prep Essentials
Begin by patting short ribs completely dry with paper towels – this crucial step ensures proper browning during the searing process. Moisture on the surface creates steam instead of the beautiful caramelization that adds depth to your final dish.
Season generously with kosher salt and freshly ground black pepper at least 45 minutes before cooking, or ideally overnight in the refrigerator. This dry-brining process allows salt to penetrate the meat, breaking down proteins for increased tenderness while enhancing natural beef flavors.
Trim any excess fat cap to about ¼ inch thickness, leaving enough for flavor and moisture while preventing greasiness in the finished dish. Remove any silver skin or tough membrane that won’t break down during cooking.
Bring seasoned ribs to room temperature 45-60 minutes before cooking to ensure even heat distribution throughout the meat. Cold meat sears unevenly and can result in tough spots.
Essential Aromatics & Base
The foundation of great braised short ribs lies in building layers of flavor through carefully selected aromatics:
Mirepoix Base:
- 2 large onions, roughly chopped
- 3 large carrots, cut into 2-inch pieces
- 4 celery stalks, cut into 2-inch pieces
- 1 head of garlic, halved crosswise
Herb Bundle:
- 4 fresh thyme sprigs
- 3 fresh rosemary sprigs
- 2 bay leaves
- Small bunch fresh parsley stems
Braising Liquid:
- 2 cups red wine (Cabernet Sauvignon or Merlot)
- 2 cups beef stock (preferably homemade)
- 2 tablespoons tomato paste
- 2 tablespoons Worcestershire sauce
Pantry Staples & Equipment
Essential pantry ingredients include high-heat cooking oil (canola or grapeseed), quality tomato paste for depth, and good red wine that you’d actually drink. The braising liquid reduces and concentrates, so inferior wine will negatively impact your final dish.
You’ll need a heavy-bottomed Dutch oven that can go from stovetop to oven – cast iron or enameled cast iron works perfectly. The heavy bottom prevents scorching during searing while retaining heat evenly during the long braising process.
Step-by-Step Cooking Instructions
Follow these detailed steps to master how to cook short ribs in the oven with perfect results every time. Learning how to cook short ribs in the oven properly requires precision in technique and timing – this makes the difference between good ribs and exceptional ones.
Step 1: Pre-Cooking Prep
Remove seasoned short ribs from refrigerator 45-60 minutes before cooking to bring to room temperature. Pat completely dry again with paper towels just before searing – any surface moisture will prevent proper browning.
Preheat your oven to 275°F while preparing other ingredients. This low temperature is crucial for breaking down tough connective tissues without overcooking the exterior meat.
Heat 2 tablespoons of high-heat oil in your Dutch oven over medium-high heat until shimmering but not smoking. The oil should be hot enough that a drop of water sizzles immediately when added.
Step 2: Searing for Maximum Flavor
Working in batches to avoid overcrowding, sear short ribs on all sides until deep golden brown, about 3-4 minutes per side. Proper searing creates the Maillard reaction that develops complex flavors and gives your finished dish restaurant-quality taste.
Don’t move the ribs until they release easily from the pot – forced flipping tears the meat and prevents proper browning. The ribs should develop a rich, caramelized crust on all surfaces.
Transfer seared ribs to a plate and set aside. Don’t worry about cooking them through at this stage – the searing is purely for flavor development.
Step 3: Building the Flavor Base
Reduce heat to medium and add chopped onions, carrots, and celery to the same pot with the rendered fat from searing. Cook for 8-10 minutes, stirring occasionally, until vegetables begin to soften and caramelize.
Add tomato paste and cook for another 2 minutes, stirring constantly to prevent burning. This step concentrates the tomato flavors and adds crucial depth to your braising liquid.
Add halved garlic head and herb bundle, stirring to combine with the softened vegetables.
Step 4: Deglazing & Assembly
Pour in red wine, scraping up all the browned bits from the bottom of the pot with a wooden spoon. These fond particles contain incredible concentrated flavors that will enhance your final dish.
Let wine simmer for 3-4 minutes to cook off the harsh alcohol while maintaining the rich wine flavors. Add beef stock and Worcestershire sauce, bringing the mixture to a gentle simmer.
Return seared short ribs to the pot, nestling them into the liquid. The braising liquid should come about 2/3 up the sides of the meat – add more stock if needed.
Step 5: Oven Braising to Perfection
Cover the Dutch oven with its lid and transfer to the preheated 275°F oven. Cook for 2.5-3 hours, checking once halfway through without removing the lid completely (just peek quickly to ensure gentle simmering).
The short ribs are done when they’re fork-tender and the meat begins to pull away from the bones easily. A fork should slide into the meat with minimal resistance.
Remove from oven and let rest for 15 minutes before serving, allowing the juices to redistribute throughout the meat for optimal texture and flavor.
Pro Tips for Perfect Meat
Master these professional techniques to elevate your short ribs from good to extraordinary when learning how to cook short ribs in the oven. These insider secrets come from years of perfecting braising methods in professional kitchens and will teach you exactly how to cook short ribs in the oven like a pro.
Avoiding Tough or Overcooked Meat
Never rush the cooking process by increasing oven temperature – higher heat causes the exterior to overcook before the interior becomes tender. The low 275°F temperature allows collagen to break down gradually into silky gelatin without drying out the meat.
Resist the urge to check the ribs frequently during cooking. Each time you remove the lid, you lose valuable heat and moisture that extends cooking time. Trust the process and only check once at the halfway point.
If ribs seem tough after the recommended cooking time, continue braising for another 30-45 minutes rather than increasing temperature. Some cuts naturally require longer cooking times, and patience always yields better results than rushing.
Essential Tool Recommendations
Invest in a quality heavy-bottomed Dutch oven with a tight-fitting lid. Le Creuset or Lodge cast iron models distribute heat evenly and retain temperature beautifully throughout the long braising process. The heavy bottom prevents hot spots that can scorch your aromatics.
A reliable instant-read thermometer helps monitor internal temperature, though properly braised short ribs should be tender rather than focused on specific temperatures. Look for 195-205°F internal temperature for fall-off-the-bone results.
Long-handled tongs are essential for safely handling hot, heavy pieces of meat during searing and serving. Choose spring-loaded tongs with good grip that won’t damage the meat’s surface.
Storage & Reheating Excellence
Store braised short ribs in their cooking liquid in the refrigerator for up to 4 days. The braising liquid prevents drying and actually improves flavor as the meat continues to absorb the seasoned liquid.
For longer storage, freeze cooked ribs covered in braising liquid for up to 3 months. Vacuum sealing or using freezer-safe containers prevents freezer burn and maintains quality. Thaw overnight in refrigerator before reheating.
Reheat gently in a 325°F oven covered with foil, or return to Dutch oven with additional braising liquid over low heat. Never use high heat for reheating, as this can toughen the meat and break down the tender texture you worked so hard to achieve.
Flavor Variations
Transform your basic oven-braised short ribs into exciting international flavors with these tested variations. Each adaptation maintains the core principles of how to cook short ribs in the oven while introducing distinctive taste profiles that showcase the versatility of this cooking method.
Spicy Heat Variations
Chipotle-Braised Short Ribs: Add 3-4 chipotle peppers in adobo sauce plus 2 tablespoons of the adobo sauce to your braising liquid. This creates smoky heat with complex pepper flavors that complement the rich beef beautifully without overwhelming the dish.
Korean-Inspired Gochujang Ribs: Replace half the red wine with rice wine and add 3 tablespoons gochujang paste to the braising liquid. Include sliced Asian pear, ginger, and soy sauce for authentic Korean flavors. Garnish with sliced scallions and sesame seeds.
Harissa-Spiced Mediterranean: Incorporate 2 tablespoons harissa paste into the braising liquid along with preserved lemons and fresh mint. This North African-inspired version pairs excellently with couscous or polenta for a complete meal.
Diet-Friendly Adaptations
Keto/Low-Carb Version: Eliminate root vegetables like carrots and focus on celery, onions, and bell peppers for your mirepoix. Use dry red wine (which is naturally low in carbs) and serve over cauliflower mash instead of traditional starches.
Paleo-Compliant: Replace Worcestershire sauce with coconut aminos and ensure your beef stock contains no additives or preservatives. Use ghee instead of oil for searing and focus on herb-forward flavoring rather than processed ingredients.
Whole30-Approved: Follow the paleo guidelines above while eliminating wine from the braising liquid. Substitute additional beef stock and apple cider vinegar for acidity, creating equally delicious results within Whole30 parameters.
Global Flavor Profiles
French Bourguignon Style: Use Burgundy wine and add pearl onions, mushrooms, and bacon lardons to create the classic French preparation. Include fresh tarragon and finish with a touch of butter for authentic richness.
Italian Brasato: Braise with Barolo wine, add fresh sage and rosemary, and include diced tomatoes for a Piedmontese-inspired version. Serve over creamy polenta or risotto for traditional Italian comfort food.
Mexican Barbacoa-Style: Add dried chilies (ancho, chipotle, guajillo), Mexican oregano, and orange juice to the braising liquid. Include bay leaves and cumin for authentic barbacoa flavors perfect for tacos or burritos.
Serving Suggestions
The rich, tender short ribs deserve equally thoughtful accompaniments that enhance rather than compete with their bold, complex flavors. Consider these pairing strategies for memorable meals.
Classic Comfort Pairings: Serve over creamy mashed potatoes, buttery polenta, or egg noodles that can absorb the incredible braising liquid. These starchy bases provide the perfect foundation for the rich, wine-reduced sauce while adding satisfying substance to the meal.
Elegant Vegetable Sides: Roasted root vegetables like parsnips, turnips, or Brussels sprouts complement the earthy flavors beautifully. The slight bitterness of roasted vegetables balances the rich meat while adding color and nutritional variety to the plate.
Fresh & Bright Contrasts: A simple arugula salad with lemon vinaigrette or gremolata (lemon zest, garlic, and parsley) cuts through the richness with fresh, acidic notes that cleanse the palate between bites.
Wine & Beverage Pairings: Full-bodied red wines like Cabernet Sauvignon, Malbec, or the same wine used for braising create perfect harmony. For beer lovers, rich stouts, porters, or Belgian dubbels provide complementary flavors without overwhelming the dish.
Bread & Grain Options: Crusty sourdough bread, herb-focused focaccia, or buttery dinner rolls are essential for soaking up every drop of the precious braising liquid. These additions turn the meal into a satisfying, complete experience perfect for cold weather dining.
FAQs
Can I use frozen short ribs for this recipe when learning how to cook short ribs in the oven?
While fresh short ribs produce the best results when you’re learning how to cook short ribs in the oven, frozen ribs can work if properly thawed. Thaw completely in the refrigerator for 24-48 hours before cooking, and pat extra dry before searing as frozen meat releases more moisture. The texture may be slightly different, but the flavor remains excellent when following this braising method.
How do I fix overcooked short ribs that have become mushy?
If ribs become overly soft from extended cooking, shred the meat and use it for sandwiches, pasta sauce, or shepherd’s pie filling. The rich braising liquid makes an excellent base for beef ragu or soup. While you can’t restore the original texture, the concentrated flavors remain delicious in these applications.
Is this recipe safe for pregnant women?
Yes, properly cooked short ribs that reach safe internal temperatures (195-205°F) are safe during pregnancy. The long braising process ensures thorough cooking that eliminates harmful bacteria. Always use a meat thermometer to verify doneness, and reheat leftovers to steaming hot (165°F) before consuming.
Why are my short ribs still tough after the recommended cooking time?
Tough ribs usually indicate insufficient cooking time rather than temperature issues. Some cuts naturally require longer braising – continue cooking for another 45-60 minutes and test again. Also ensure you’re using appropriate cuts like English-cut short ribs rather than lean cuts that don’t respond well to braising.
Can I make this recipe without wine?
Absolutely! Replace the wine with additional beef stock plus 2 tablespoons of red wine vinegar or balsamic vinegar for acidity. You can also use grape juice mixed with vinegar, or simply increase the beef stock and add extra aromatics like mushrooms for deeper flavor development.
How can I make the braising liquid into a proper sauce?
After removing the cooked ribs, strain the braising liquid through a fine-mesh sieve and return to the pot. Simmer over medium heat until reduced by half, creating a concentrated sauce. For extra richness, whisk in cold butter one piece at a time, or thicken slightly with a cornstarch slurry if desired.
Conclusion
Mastering how to cook short ribs in the oven opens up a world of incredible, restaurant-quality meals right in your own kitchen! This foolproof method for how to cook short ribs in the oven transforms affordable cuts into luxurious dining experiences that will impress family and guests alike. The combination of proper searing, aromatic vegetables, and low, slow cooking creates depth of flavor that rivals the finest steakhouses.
Fire up your oven and try this recipe this weekend – your kitchen will smell amazing and your dinner table will be the star of the show! The hands-off cooking method makes it perfect for entertaining, while the make-ahead friendly nature means you can prepare it days in advance for stress-free hosting.
Join the thousands of home cooks who’ve made this their signature recipe for special occasions and comfort food cravings! The technique works beautifully for meal prep, and leftovers actually improve in flavor over time. Ready to expand your braising skills? Try our Ultimate Guide to Beef Bourguignon or discover the secrets of Perfect Osso Buco for more show-stopping braises that will elevate your cooking repertoire.
Did you like this recipe?
There are no reviews yet. Be the first one to write one.