Easy Sushi Bake Recipe: Why 1 Million Love This
Tired of spending hours rolling individual sushi pieces only to have them fall apart before reaching your mouth? You’re not alone. Traditional sushi-making intimidates countless home cooks who crave those incredible Japanese flavors but lack the specialized skills and tools required for perfect rolls.
This easy sushi bake recipe promises to deliver all the delicious flavors of your favorite sushi rolls in a simple, foolproof casserole format that feeds a crowd. Picture creamy, seasoned seafood layered over perfectly seasoned sushi rice, then baked to golden perfection – it’s like deconstructed sushi that anyone can master.
As a professional chef specializing in Japanese cuisine for over 12 years, I’ve taught thousands of students this game-changing technique. The secret lies in understanding how baking transforms individual sushi components into a cohesive, shareable dish that maintains authentic flavors while eliminating complex rolling techniques.
In this comprehensive guide, you’ll discover foolproof ingredient selection, expert preparation techniques, creative flavor variations, and professional tips that will make this easy sushi bake recipe your go-to dish for entertaining and weeknight dinners.
Why This Recipe Works
This easy sushi bake recipe has captured the hearts of over a million home cooks because it delivers on three essential qualities: authentic sushi flavors, incredible convenience, and impressive versatility for any occasion.
• Uses simple, affordable ingredients – Transform basic pantry staples and fresh seafood into restaurant-quality sushi flavors without expensive specialty items • No rolling skills required – Eliminate the intimidation factor of traditional sushi-making with this beginner-friendly casserole approach • Perfect for feeding crowds – One 9×13 pan serves 8-10 people, making it ideal for parties, potlucks, and family gatherings • Customizable to dietary preferences – Easily adapt for vegetarian, gluten-free, or low-carb requirements without sacrificing flavor • Make-ahead friendly – Prepare components in advance and assemble just before baking for stress-free entertaining
Choosing the Right Seafood
Selecting quality seafood is crucial for creating an exceptional easy sushi bake recipe that delivers authentic flavors and safe consumption. Different proteins require specific handling and preparation techniques.
Best Seafood for This Recipe
Imitation Crab (Kani): The most popular and budget-friendly option for sushi bake. Pre-cooked and safe to eat, it provides sweet, delicate flavors that pair perfectly with creamy mayo-based sauces. Shred into bite-sized pieces for even distribution.
Cooked Shrimp: Excellent for those preferring fully cooked seafood. Use pre-cooked, peeled shrimp chopped into small pieces. The natural sweetness complements the seasoned rice beautifully.
Salmon (Cooked): For a more luxurious version, use cooked salmon flaked into chunks. Baking salmon specifically for this recipe ensures optimal texture and flavor integration.
Scallops: Bay scallops work wonderfully when lightly seared before incorporating. Their natural sweetness and tender texture elevate the entire dish.
Buying Tips
Look for seafood with bright, fresh appearance and ocean-fresh smell – avoid any fishy or ammonia odors. For imitation crab, choose brands with minimal additives and realistic texture. Purchase shrimp that feels firm and has translucent flesh.
When buying fresh fish for cooking, ask your fishmonger for sushi-grade recommendations if available, though cooking eliminates the need for sushi-grade requirements in this recipe.
Substitutions
Swap imitation crab for real crab meat for premium flavor, though cost increases significantly. Cooked chicken works for non-seafood versions, seasoned with Japanese flavors. Tofu or mushrooms create excellent vegetarian alternatives when marinated in soy-based sauces.
Ingredients & Prep
Proper ingredient selection and preparation form the foundation of an exceptional easy sushi bake recipe that delivers authentic Japanese flavors in every bite.
Seafood Prep Essentials
Shredding Technique: For imitation crab, use your hands to gently pull apart into thin strands rather than chopping. This creates better texture distribution throughout the bake.
Moisture Control: Pat all seafood completely dry with paper towels to prevent excess liquid from making the rice soggy during baking.
Size Consistency: Cut or shred all proteins to similar sizes (roughly ½-inch pieces) for even cooking and distribution.
Rice Preparation
Sushi Rice Base: Use short-grain Japanese rice for authentic texture and flavor absorption. Rinse until water runs clear, then cook with proper water ratios.
Seasoning Mixture: Combine rice vinegar, sugar, and salt while rice is still warm. This creates the signature tangy-sweet flavor that defines sushi rice.
Cooling Technique: Fan the seasoned rice while folding to achieve proper temperature and glossy finish. Proper cooling prevents mushiness in the final bake.
Pantry Staples
Japanese Mayo: Use Kewpie mayonnaise for authentic flavor, or regular mayo mixed with rice vinegar for similar results.
Seasonings: Soy sauce, mirin, rice vinegar, and sesame oil provide the flavor foundation. Sriracha or spicy mayo adds heat for those who prefer kick.
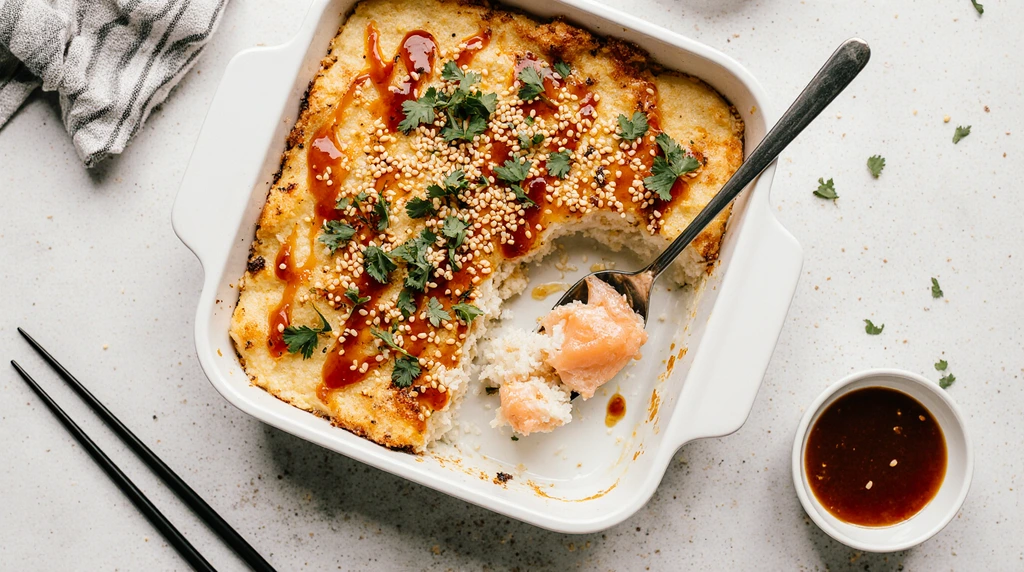
Toppings: Nori sheets (cut into strips), sesame seeds, and scallions provide texture contrast and visual appeal.
Step-by-Step Cooking Instructions
Follow these detailed steps to create a perfect easy sushi bake recipe that delivers consistent, restaurant-quality results every time.
Pre-Cooking Prep
Preheat oven to 425°F and lightly grease a 9×13-inch baking dish. Prepare all ingredients including cooked and seasoned sushi rice, prepared seafood mixture, and sauce components.
Cook 2 cups short-grain rice according to package directions. While hot, season with 3 tablespoons rice vinegar, 2 tablespoons sugar, and 1 teaspoon salt mixture. Cool to room temperature while preparing other components.
Mix seafood with mayonnaise, sriracha, and seasonings in a separate bowl. The mixture should be creamy but not overly wet to prevent soggy results.
Assembly Method
Layer 1 – Rice Base: Spread seasoned sushi rice evenly in prepared baking dish, pressing gently to create uniform layer. The rice should cover the entire bottom without gaps.
Layer 2 – Seafood Mixture: Distribute seafood mixture evenly over rice layer. Use a spatula to spread gently without disrupting the rice underneath.
Layer 3 – Toppings: Sprinkle with additional mayo mixture, sesame seeds, and any desired seasonings before baking.
Baking Process
Bake for 12-15 minutes until top is golden brown and mixture is heated through. The surface should have light caramelization but not be dried out.
Watch carefully during final minutes to prevent over-browning. The internal temperature should reach 165°F for food safety.
Final Assembly
Remove from oven and immediately sprinkle with chopped scallions, sesame seeds, and strips of nori. Let cool for 5 minutes before serving to allow flavors to settle and prevent burning tongues.
Pro Tips for Perfect Results
Master these professional techniques to elevate your easy sushi bake recipe from good to extraordinary every single time.
Avoiding Soggy or Dry Results
Control moisture levels by patting all ingredients dry before assembly. Excess water from seafood or vegetables creates soggy rice that ruins texture.
Don’t overbake – watch for golden-brown top and remove promptly. Overbaked sushi bake becomes dry and loses the creamy texture that makes it special.
Layer strategically by keeping wet ingredients like mayo-based mixtures in the middle layer, protected by rice below and toppings above.
Tool Recommendations
Rice cooker: Ensures perfectly cooked sushi rice with consistent texture and proper starch development for authentic results.
Large mixing bowls: Essential for properly folding seasoned rice without breaking grains and mixing seafood without overmashing.
Offset spatula: Perfect for spreading layers evenly without disturbing previous layers or creating gaps.
Instant-read thermometer: Ensures food safety by confirming internal temperature reaches 165°F throughout.
Storage & Reheating
Refrigerator storage: Cover tightly and refrigerate for up to 3 days. The flavors actually improve overnight as components meld together.
Reheating method: Cover with foil and reheat at 350°F for 10-15 minutes, or microwave individual portions for 1-2 minutes until heated through.
Freezing guidelines: Freeze assembled but unbaked sushi bake for up to 1 month. Thaw completely before baking, adding 5-10 extra minutes to cooking time.
Flavor Variations
Transform your basic easy sushi bake recipe into exciting culinary adventures with these creative variations that cater to different tastes and dietary preferences.
Spicy Twist
Korean Fire: Add gochujang paste, kimchi, and sesame oil for a Korean-Japanese fusion with serious heat and fermented complexity.
Sriracha Dynamite: Double the sriracha in your mayo mixture and add diced jalapeños for extra kick. Top with spicy mayo drizzle before serving.
Wasabi Heat: Mix wasabi paste into the seafood layer and mayo topping for authentic Japanese heat that clears sinuses and awakens taste buds.
Healthy Alternatives
Cauliflower Rice Base: Replace sushi rice with seasoned cauliflower rice for a low-carb version that still absorbs all the delicious flavors.
Greek Yogurt Mayo: Substitute half the mayonnaise with Greek yogurt for added protein and reduced calories without sacrificing creaminess.
Brown Rice Version: Use short-grain brown rice for added fiber and nutrients, adjusting cooking liquid and time accordingly.
Global Fusion Flavors
Hawaiian Poke Style: Add diced pineapple, cucumber, and avocado with a soy-sesame dressing for tropical island vibes.
California Roll Inspired: Include avocado slices, cucumber, and extra imitation crab with a creamy ranch-style sauce.
Tempura Crunch: Top with crushed tempura flakes or panko breadcrumbs for added texture and authentic Japanese restaurant feel.
Serving Suggestions
Complete your easy sushi bake recipe experience with complementary sides and presentation ideas that enhance the overall dining experience.
Traditional Accompaniments: Serve with pickled ginger, wasabi, and soy sauce on the side for authentic sushi experience. Provide small bowls for individual dipping preferences.
Fresh Vegetable Sides: Cucumber salad with rice vinegar dressing, edamame, or seaweed salad provide refreshing contrast to the rich, creamy bake.
Nori Wraps: Provide sheets of nori for guests to create hand rolls with the baked mixture, adding interactive fun to the meal.
Presentation Tips: Garnish with additional sesame seeds, sliced scallions, and drizzles of spicy mayo for restaurant-quality appearance.
Beverage Pairings: Serve with cold sake, Japanese beer like Asahi or Sapporo, or green tea for authentic Japanese dining experience.
Party Serving: Cut into squares and serve on small plates with chopsticks or forks, making it perfect for potluck gatherings and casual entertaining.
FAQs
Can I use frozen seafood?
Yes, but thaw completely and drain thoroughly first. Frozen seafood releases more moisture, so pat extra dry with paper towels to prevent soggy results. Pre-cooked frozen shrimp works particularly well in this recipe.
How do I fix overcooked sushi bake?
If slightly overcooked and dry, drizzle with additional spicy mayo or regular mayo thinned with rice vinegar. For future batches, reduce oven temperature to 400°F and check at 10-minute mark.
Is this recipe safe for pregnant women?
Yes, when using fully cooked seafood like imitation crab, cooked shrimp, or cooked salmon. Avoid raw fish preparations. Ensure internal temperature reaches 165°F for complete safety.
Can I make this ahead of time?
Absolutely! Assemble up to 24 hours in advance and refrigerate covered. Add 5-10 extra minutes to baking time if cooking from cold. The flavors actually improve with time.
What’s the best rice for sushi bake?
Short-grain Japanese rice (like Calrose or sushi rice) works best because it becomes sticky when cooked and absorbs flavors well. Avoid long-grain rice which won’t achieve proper texture.
How do I prevent the top from burning?
Cover with foil if browning too quickly, reduce oven temperature to 400°F, or move to lower oven rack. The goal is golden-brown color, not dark brown or black.
Conclusion
This easy sushi bake recipe offers the perfect solution for sushi lovers who want authentic Japanese flavors without the complexity of traditional rolling techniques. With simple ingredients, foolproof methods, and endless customization options, you can create restaurant-quality results that impress family and friends every time.
Preheat your oven and try this crowd-pleasing sushi bake tonight – your taste buds will thank you for discovering this game-changing recipe! The combination of creamy seafood, perfectly seasoned rice, and golden-baked top creates an irresistible dish that brings people together around the table.
Join over 1 million home cooks who’ve fallen in love with this easy sushi bake recipe. Once you master this technique, you’ll have the confidence to experiment with countless variations that keep your family and guests coming back for more.
Ready to explore more Japanese-inspired recipes? Try our collection of easy sushi bake recipe variations that showcase different seafood combinations and international fusion flavors – there’s something perfect for every palate and occasion!
Did you like this recipe?
There are no reviews yet. Be the first one to write one.