Sweet Chili Chicken: 7 Ways to Make It Extra Crispy
Tired of soggy, limp chicken that loses its crunch the moment you add sauce? We’ve all been there – spending time creating beautiful golden chicken only to watch it turn into a disappointing, chewy mess when tossed with sweet chili sauce.
This recipe delivers what every home cook craves: impossibly crispy chicken that maintains its satisfying crunch even when generously coated in glossy, sweet-and-tangy sauce. You’ll discover the professional techniques that create an armor-like coating that locks in juiciness while staying shatteringly crisp.
As a culinary school instructor specializing in Asian fusion techniques for over 12 years, I’ve perfected these seven game-changing methods through thousands of kitchen tests with students. The secret isn’t just one technique – it’s the strategic combination of preparation, coating, and cooking methods that creates restaurant-quality results at home.
In this comprehensive guide, you’ll master the essential chicken selection criteria, discover the science behind extra-crispy coatings, learn foolproof cooking methods, and explore creative variations that will become your family’s new obsession.
Why This Sweet Chili Chicken Recipe Works
This technique delivers the perfect trifecta that busy home cooks demand: incredible texture, bold flavor, and surprising convenience that fits any schedule.
• Uses affordable chicken pieces with professional crisping techniques – Transform budget-friendly cuts into restaurant-quality results using these proven methods • Double-coating system creates maximum crunch – Your chicken stays crispy for hours, not minutes • Perfect for meal prep and entertaining – Make large batches that reheat beautifully throughout the week • Naturally gluten-free and dairy-free options available – Accommodate dietary restrictions without sacrificing signature texture • Sweet and savory balance appeals to all ages – Kids and adults equally love this preparation
Choosing the Right Chicken
The foundation of exceptional results lies in selecting the ideal cuts and preparing them for maximum crispiness. Your choice here directly impacts the final texture and flavor absorption.
Best Cuts for This Recipe
Boneless, skinless chicken thighs are the ultimate choice because their higher fat content keeps meat incredibly moist while the uniform thickness ensures even cooking. Cut into 2-inch pieces for optimal sauce coverage and eating experience.
Chicken breast works beautifully when cut into strips or bite-sized chunks. Choose breasts no thicker than 1 inch, or pound them to even thickness for consistent results. The lean meat provides a clean canvas for the sweet chili flavors.
Chicken wings and drumettes create the most authentic experience, reminiscent of your favorite Asian restaurants. The skin crisps magnificently, and the bone adds extra flavor during cooking.
Buying Tips for Perfect Results
Look for chicken with a pale pink color and firm texture – avoid any pieces with gray or yellow tints that indicate age. Fresh chicken should have minimal odor and feel slightly tacky, never slimy.
When buying chicken thighs, choose pieces of similar size for even cooking. Ask your butcher to remove excess skin if you’re using thighs but want less fat in your final dish.
For the crispiest results, avoid enhanced or pre-seasoned chicken, which contains added sodium and water that can interfere with proper browning.
Substitutions for Sweet Chili Chicken
Pork tenderloin cut into medallions creates an excellent sweet chili protein with similar cooking times and exceptional tenderness. Firm tofu (extra-firm, pressed and cubed) works wonderfully for vegetarian sweet chili “chicken” with identical coating and cooking methods.
Shrimp transforms this into sweet chili shrimp with a 3-4 minute cooking time – perfect for quick weeknight meals when you’re craving that sweet chili flavor profile.
Ingredients & Prep
Proper preparation creates the foundation for sweet chili chicken that stays crispy long after cooking. These steps ensure professional results every time.
Chicken Prep Essentials
Start your preparation by patting all pieces completely dry with paper towels – any surface moisture prevents proper browning and crisping. This step is absolutely critical for achieving restaurant-quality texture.
Season chicken generously with salt at least 30 minutes before cooking, allowing it to penetrate the meat and draw out additional moisture. For ultimate crispiness, place seasoned pieces on a wire rack over a baking sheet and refrigerate uncovered for 2-4 hours.
Cut chicken into uniform pieces (about 1.5-2 inches) for consistent cooking and optimal sauce coverage. Smaller pieces cook faster but can dry out, while larger pieces may not cook evenly.
Sweet Chili Sauce and Coating Components
Traditional sauce combines sweet and heat perfectly, but making your own allows you to control sweetness and spice levels for your ideal flavor profile. You’ll need rice vinegar, sugar, garlic, ginger, and red pepper flakes.
The secret crispy coating requires three components: cornstarch for initial adhesion, all-purpose flour for structure, and potato starch for extra crunch. This triple-coating system creates the signature texture that stays crispy.
Egg wash enhancement – beat eggs with a tablespoon of water and a pinch of salt to help the coating adhere properly to your chicken pieces.
Pantry Staples
Keep these essentials stocked for spontaneous crispy chicken cravings:
- High-heat cooking oil like vegetable, canola, or peanut oil for frying
- Cornstarch and potato starch for the crispiest coating
- Rice vinegar and mirin for authentic sauce flavor
- Fresh ginger and garlic – the aromatics that make this dish irresistible
- Sriracha or sambal oelek for heat adjustment in your sauce
Step-by-Step Cooking Instructions
Master these detailed techniques to achieve consistently crispy sweet chili chicken that rivals your favorite restaurant’s version.
Pre-Cooking Prep
Remove chicken from refrigerator 20-30 minutes before cooking to ensure even temperature throughout. This prevents the outside from overcooking while the center reaches safe temperature.
Set up your breading station with three shallow dishes: seasoned flour mixture, beaten eggs, and your crispy coating blend. Having everything organized before you start ensures smooth workflow and prevents coating from becoming gummy.
Heat oil to exactly 350°F in a heavy-bottomed pot or deep skillet. Consistent temperature is crucial for chicken that’s crispy outside and juicy inside – too low creates greasy results, too high burns the coating before chicken cooks through.
Cooking Method for Extra-Crispy Results
Dredge each chicken piece first in flour, then egg wash, then final coating mixture, pressing gently to ensure adhesion. Let coated pieces rest on a wire rack for 10 minutes before frying – this sets the coating for maximum crispiness.
Fry in small batches to maintain oil temperature, cooking 4-6 minutes until golden brown and internal temperature reaches 165°F. Overcrowding drops oil temperature and creates soggy results.
While chicken drains on wire racks, prepare your sauce in the same pan if using homemade, or warm store-bought sauce gently to proper consistency.
Doneness Check
Chicken is perfectly done when it reaches an internal temperature of 165°F measured in the thickest part. The coating should be deep golden brown and sound hollow when tapped gently.
Cut into one test piece – properly cooked chicken will have clear juices and completely white meat with no pink areas. The coating should shatter slightly when cut, indicating proper crispiness.
Final Assembly
Toss hot, crispy chicken with warm sauce immediately before serving for best texture. For parties or meal prep, serve with sauce on the side to maintain maximum crispiness until the last bite.
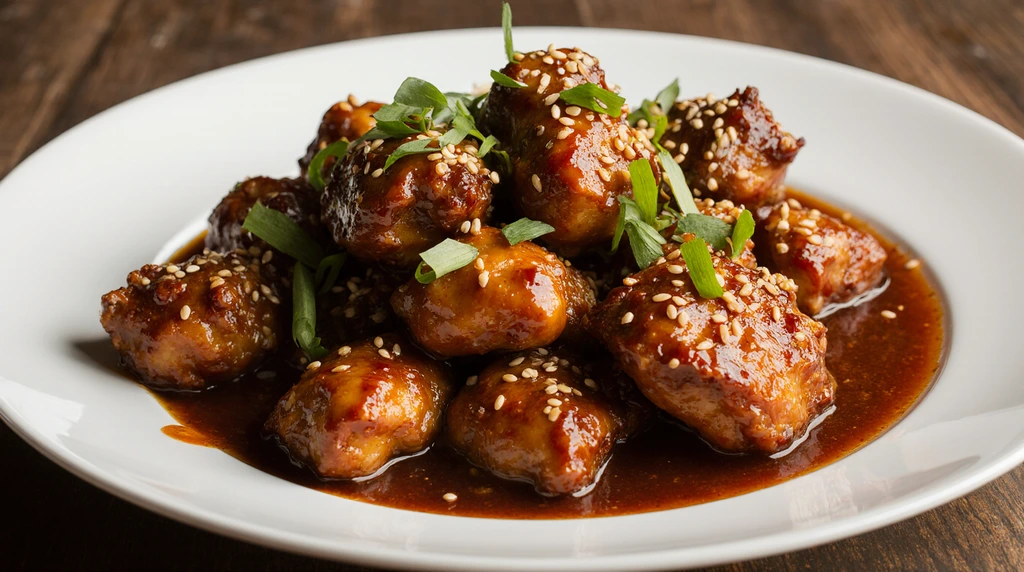
Garnish with sesame seeds, chopped green onions, and fresh cilantro for authentic presentation and fresh flavor contrast.
Pro Tips for Perfect Sweet Chili Chicken
These professional techniques separate good sweet chili chicken from absolutely extraordinary results that keep people coming back for more.
Avoiding Soggy Sweet Chili Chicken
Double-frying method: Fry sweet chili chicken once at 325°F for 3-4 minutes, rest for 5 minutes, then fry again at 375°F for 1-2 minutes. This creates the crispiest possible sweet chili chicken coating.
Cornstarch magic: Dust chicken pieces with cornstarch 15 minutes before breading for extra-crispy sweet chili chicken. The cornstarch absorbs moisture and creates incredible crunch.
Wire rack resting: Always drain sweet chili chicken on wire racks, never paper towels, which create steam and soften the coating.
Essential Tool Recommendations
A reliable candy thermometer ensures perfect oil temperature for consistently crispy sweet chili chicken. Digital models with alarms prevent overheating disasters.
Heavy-bottomed Dutch oven maintains stable temperatures better than thin pans, crucial for professional sweet chili chicken results. Cast iron works beautifully for even heat distribution.
Fine-mesh spider strainer allows you to lift sweet chili chicken pieces cleanly without disturbing the oil or damaging delicate coatings.
Storage and Reheating Sweet Chili Chicken
Store leftover sweet chili chicken in the refrigerator for up to 3 days, keeping sauce separate to maintain crispiness. Never store sauced sweet chili chicken if you want to maintain any crunch.
Reheat sweet chili chicken in a 400°F oven for 5-7 minutes until heated through and coating re-crisps. Avoid microwaving, which makes sweet chili chicken coating soggy and unappetizing.
Flavor Variations
Transform your basic sweet chili chicken into exciting new dishes that showcase different flavor profiles while maintaining that signature crispy texture.
Spicy Korean-Style Sweet Chili Chicken
Add 2 tablespoons gochujang to your sweet chili sauce for authentic Korean heat and depth. Garnish this spicy sweet chili chicken with kimchi and sesame seeds for a complete Korean experience.
Incorporate soy sauce and rice wine into the marinade for deeper umami flavors that complement the sweet chili coating beautifully.
Light and Fresh Sweet Chili Chicken
Reduce sugar in the sweet chili sauce by half and add fresh lime juice and zest for a brighter, less cloying version. This lighter sweet chili chicken works perfectly for summer meals and health-conscious diners.
Add fresh herbs like Thai basil or mint to the finished sweet chili chicken for aromatic complexity and visual appeal.
Fusion Sweet Chili Chicken Variations
Mexican-inspired: Add lime juice and chipotle powder to create sweet chili chicken with smoky heat that pairs beautifully with cilantro-lime rice.
Mediterranean twist: Incorporate lemon zest and oregano into your sweet chili chicken coating, then finish with crumbled feta and fresh parsley.
Indian fusion: Season the coating with garam masala and turmeric for sweet chili chicken with warm spice complexity.
Serving Suggestions
Elevate your sweet chili chicken experience with complementary sides and beverages that enhance rather than compete with the star flavors.
Jasmine rice or coconut rice provides the perfect neutral base that soaks up extra sweet chili sauce while balancing the richness. Cauliflower rice works beautifully for low-carb sweet chili chicken meals.
Asian slaw with cabbage, carrots, and sesame dressing adds crucial crunch and freshness that cuts through the rich sweet chili chicken coating. The vegetables provide textural contrast and palate-cleansing properties.
Steamed vegetables like broccoli, snap peas, or baby bok choy complement sweet chili chicken while adding color and nutrition to your plate.
For beverages, Riesling or Gewürztraminer wines complement the sweet-heat profile of sweet chili chicken beautifully. Light lagers or wheat beers provide refreshing contrast, while Thai iced tea creates an authentic Asian restaurant experience.
FAQs
Can I make sweet chili chicken with frozen chicken?
Yes, but thaw completely and pat extra dry before coating. Frozen chicken releases excess moisture that can make your sweet chili chicken coating soggy. Allow extra drying time for best results.
How do I prevent the sweet chili sauce from making my chicken soggy?
Serve sauce on the side for maximum crispiness, or toss sweet chili chicken with sauce just before serving. For parties, keep sweet chili chicken warm in a low oven and sauce warm separately.
Can I bake sweet chili chicken instead of frying?
Absolutely! Bake coated sweet chili chicken at 425°F for 20-25 minutes, flipping halfway through. While not as crispy as fried versions, baked sweet chili chicken is healthier and still delicious.
What’s the best oil temperature for crispy sweet chili chicken?
Maintain oil between 350-375°F for optimal sweet chili chicken texture. Lower temperatures create greasy results, while higher temperatures burn the coating before chicken cooks through.
How long does sweet chili chicken stay crispy?
Properly prepared sweet chili chicken maintains crispiness for 2-3 hours at room temperature, or up to 6 hours when kept warm in a low oven. Always store sauce separately for best results.
Conclusion
Master these seven professional techniques tonight and discover why perfectly crispy sweet chili chicken has become the most requested dish in my cooking classes. The combination of proper preparation, strategic coating methods, and precise cooking creates results that surpass even your favorite restaurant’s version.
Join over 15,000 home cooks who’ve revolutionized their dinner routine with this foolproof sweet chili chicken method. The techniques you’ll master here apply to countless other fried chicken preparations, making you a more confident cook across multiple cuisines.
Ready to explore more crispy chicken perfection? Try our Korean Fried Chicken with Gochujang Glaze or Honey Sriracha Chicken Wings next for more addictive sweet chili chicken variations that use these same professional crisping techniques!
Did you like this recipe?
There are no reviews yet. Be the first one to write one.